
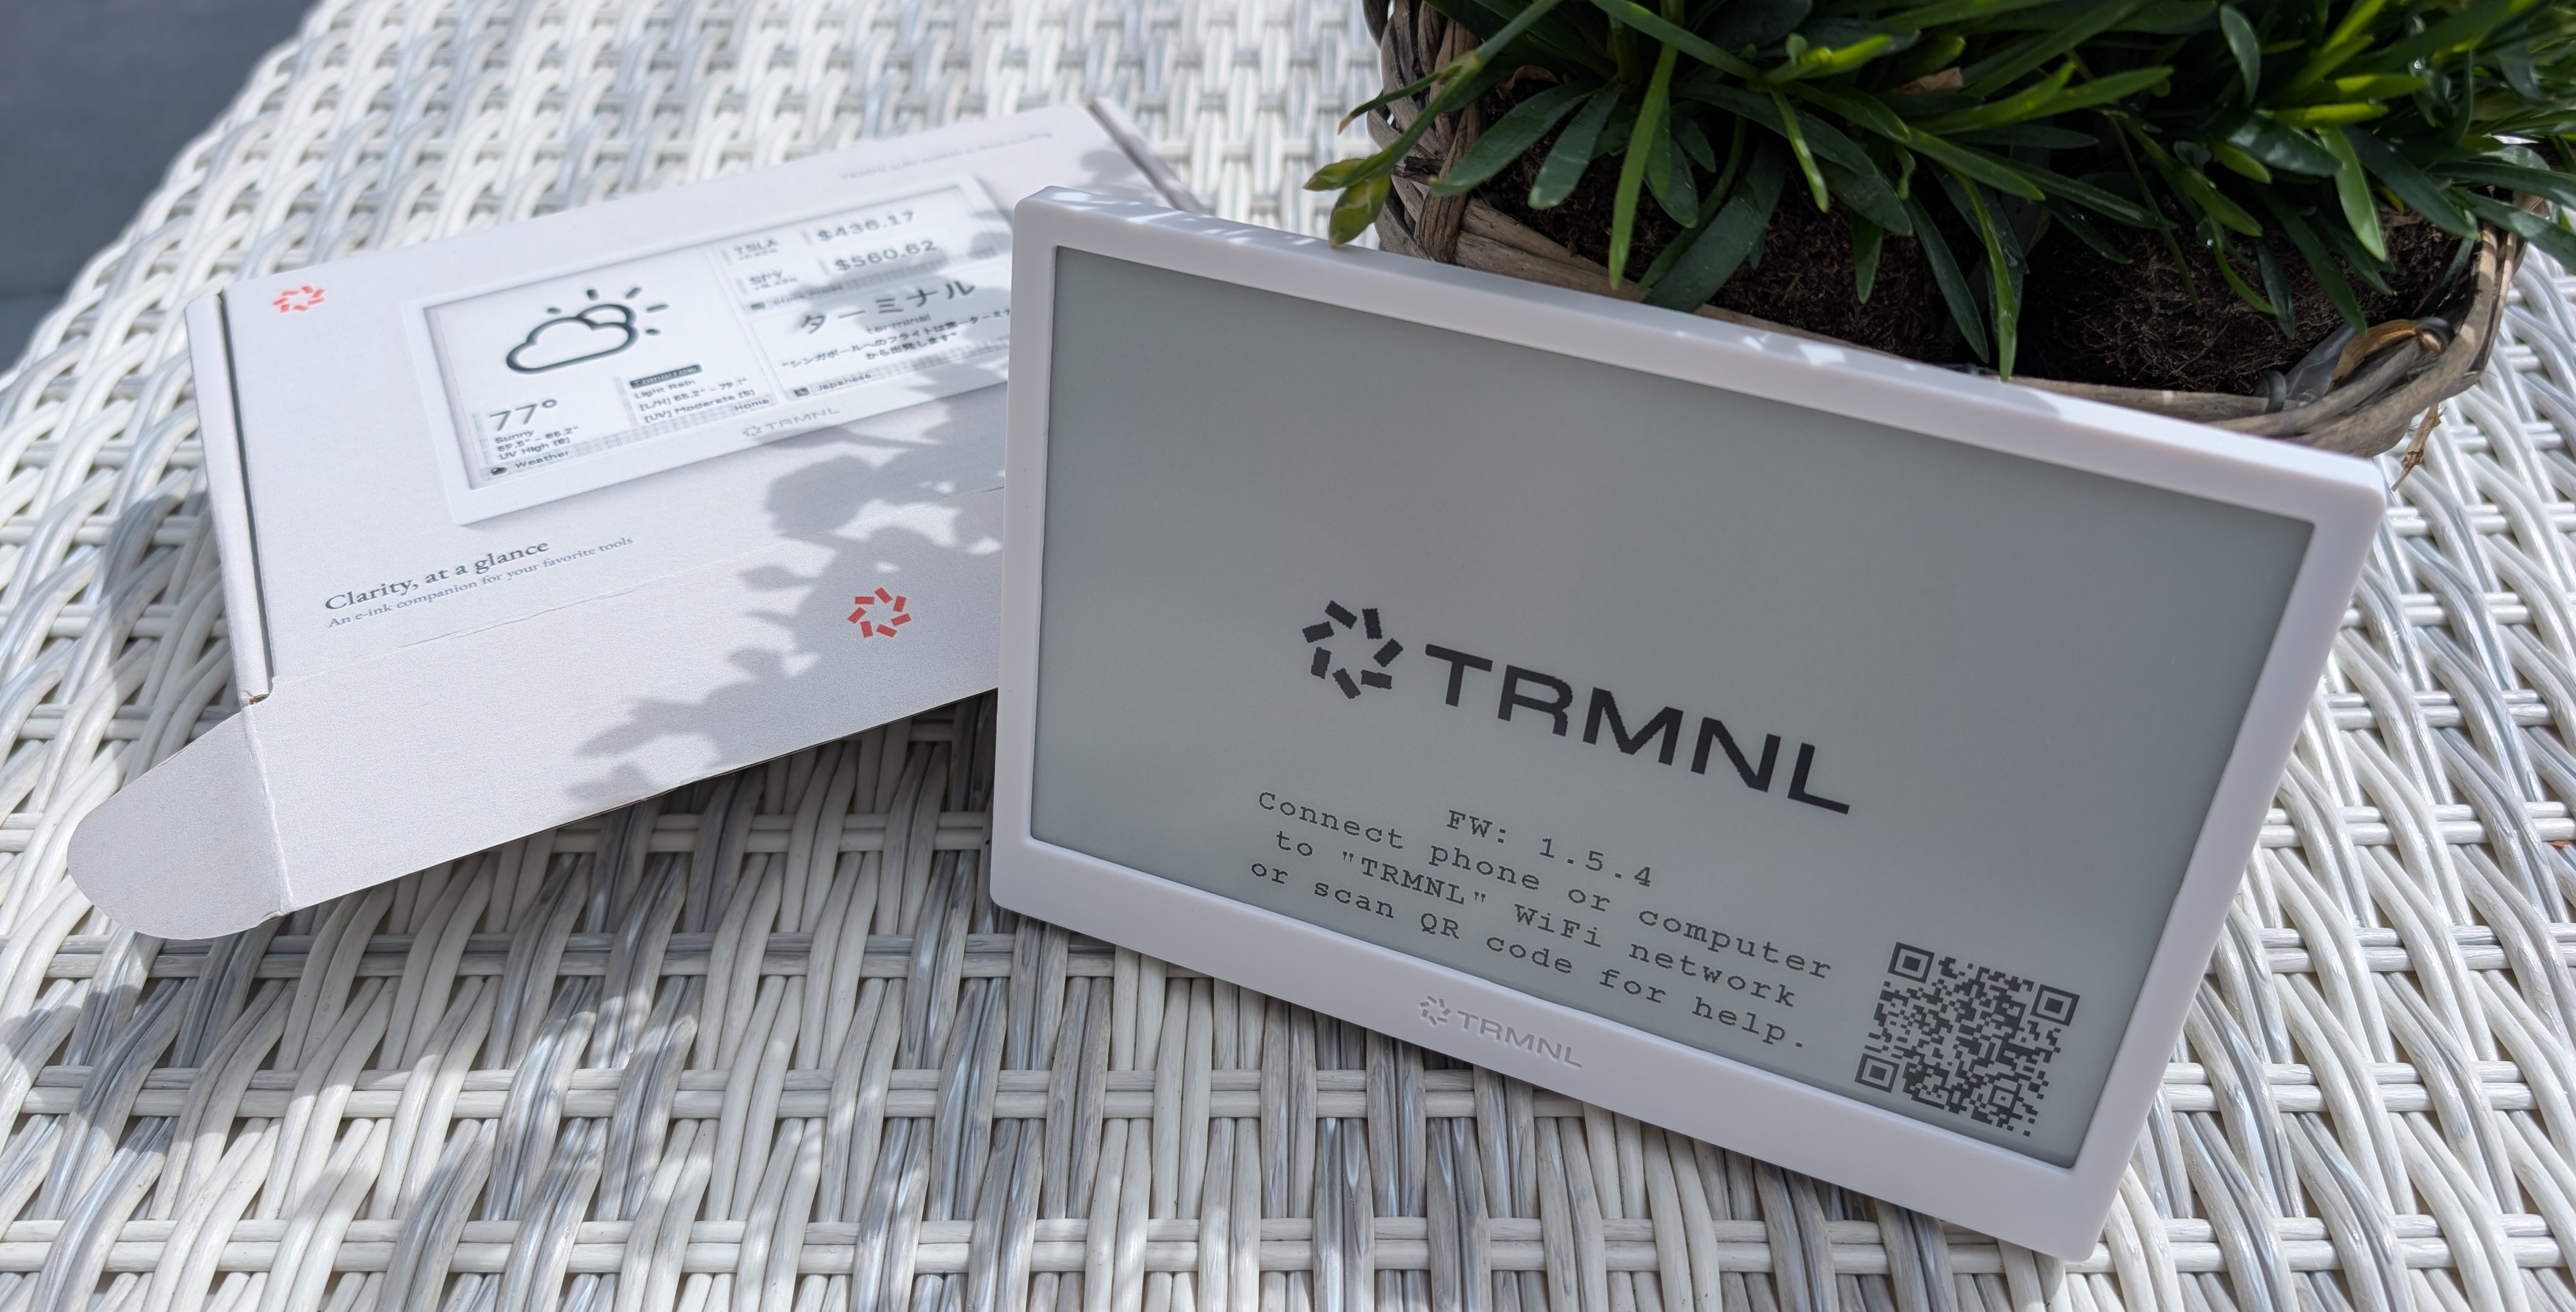
I got a TRMNL! A really cool little device. It's battery-powered e-ink device that you can hang on a wall like a frame/info display, or use the built-in desk stand to have it at your desk. By default the company offers a cloud service to manage, host and build dashboards. But I prefer to keep my stuff local, inside my network, and TRMNL allows me to use my own local server for a fully local device.
Even better, the firmware is open source, so I also have the possibility to modify the on-device software if the need arise. A really nice open platform, targeted at people like me. But it's also quite useful in combination with the cloud service for normal users.
How I intend to use it
This will hang in the kitchen with generic information for my family. A shared calendar, and some data from Home Assistant like sensors, electricity price and a shopping list. Weather probably and whatever I, or we, have use of.
I intend to power it via a small standalone server that I will write myself. The API is really simple to get going, I hope, it looks simple. This blog post will document my experience and discoveries to get going with my new TRMNL with FW version 1.5.4.
Follow me along!
Without reading to much code and documentation I will try to figure out how to use this thing. I think this is an interesting experiment to see how easy this is to figure out in the future if the company behind it disappears with all documentation and cloud services.
Setup process
When I joined the TRMNL's WIFI network, it opened a captive portal page on my phone. On my Pixel, I had to close the WIFI dialog to actually see the page. The connection to the TRMNL's network then disconnected on the first try because my phone detected no underlying internet connection and reverted to my normal WIFI. An annoyance and a UX problem with my phone, not an issue with the TRMNL.
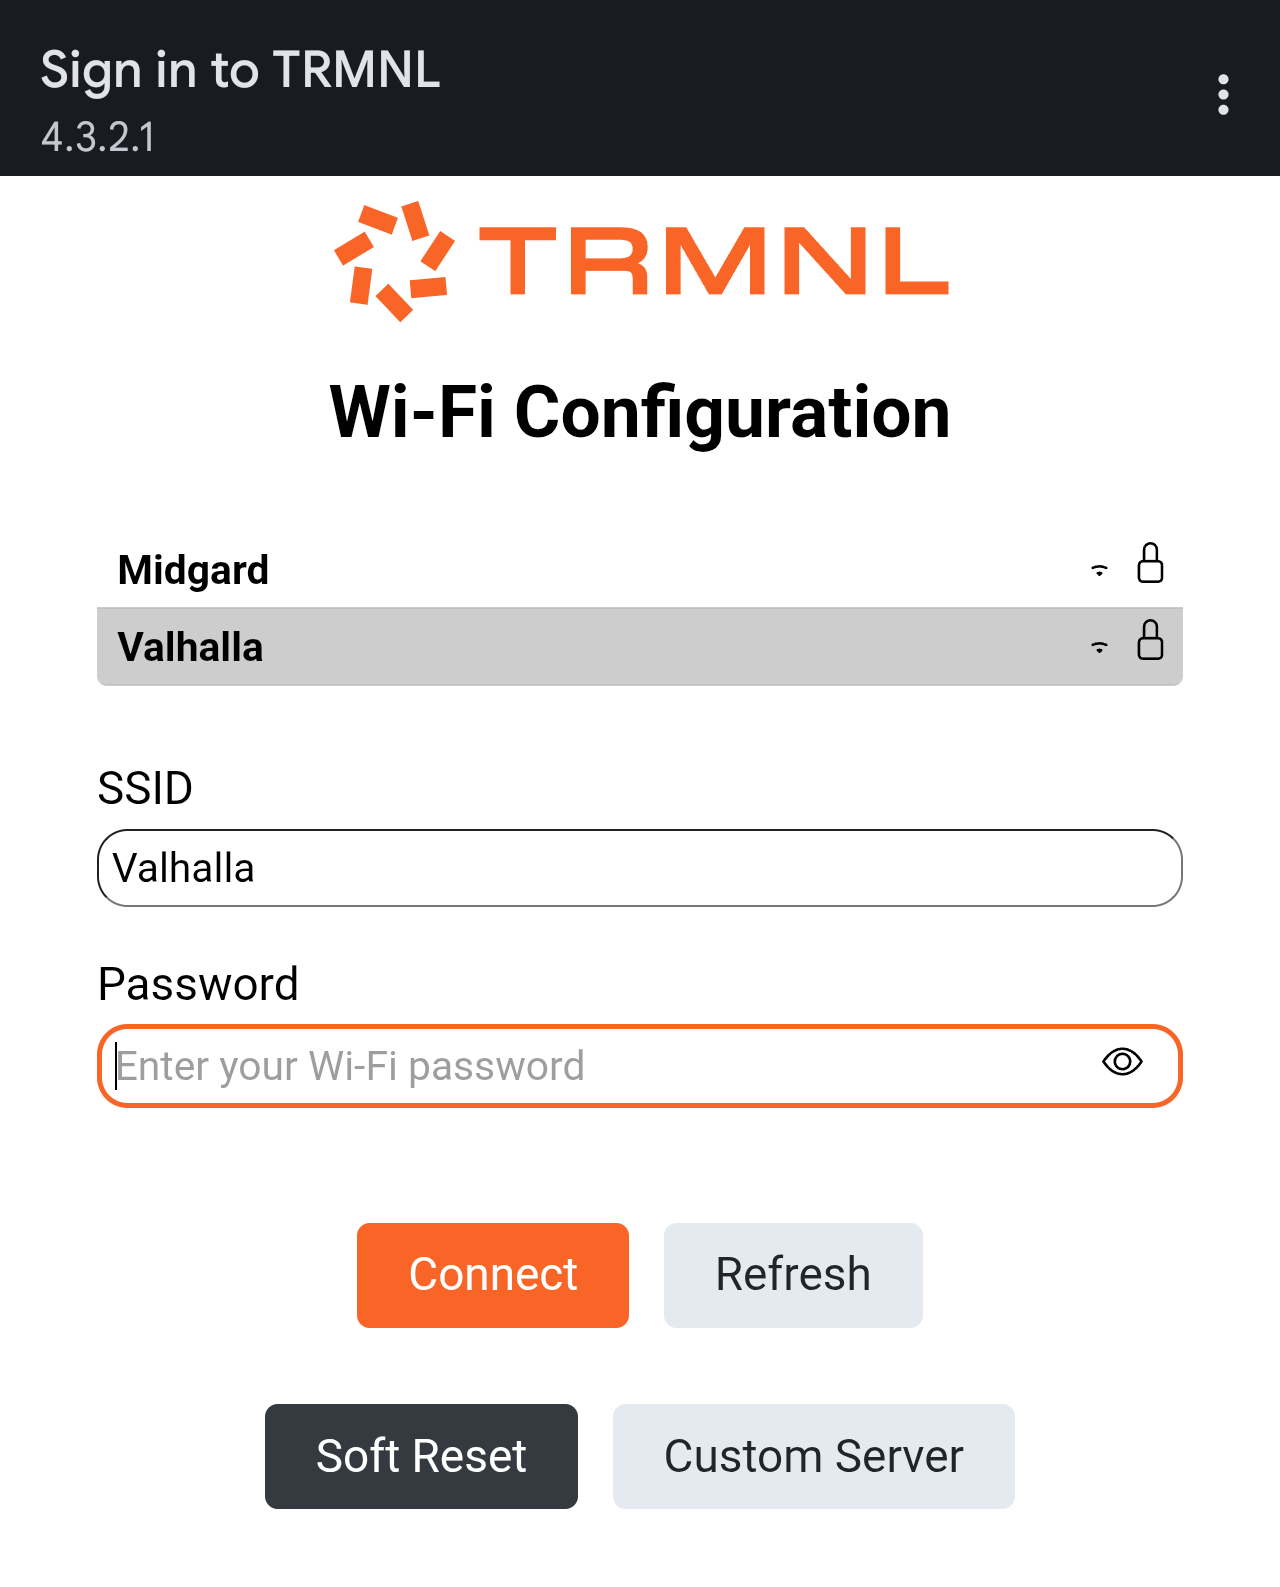
I selected my WIFI, entered my password and pressed connect. It rebooted to this screen below, gah!
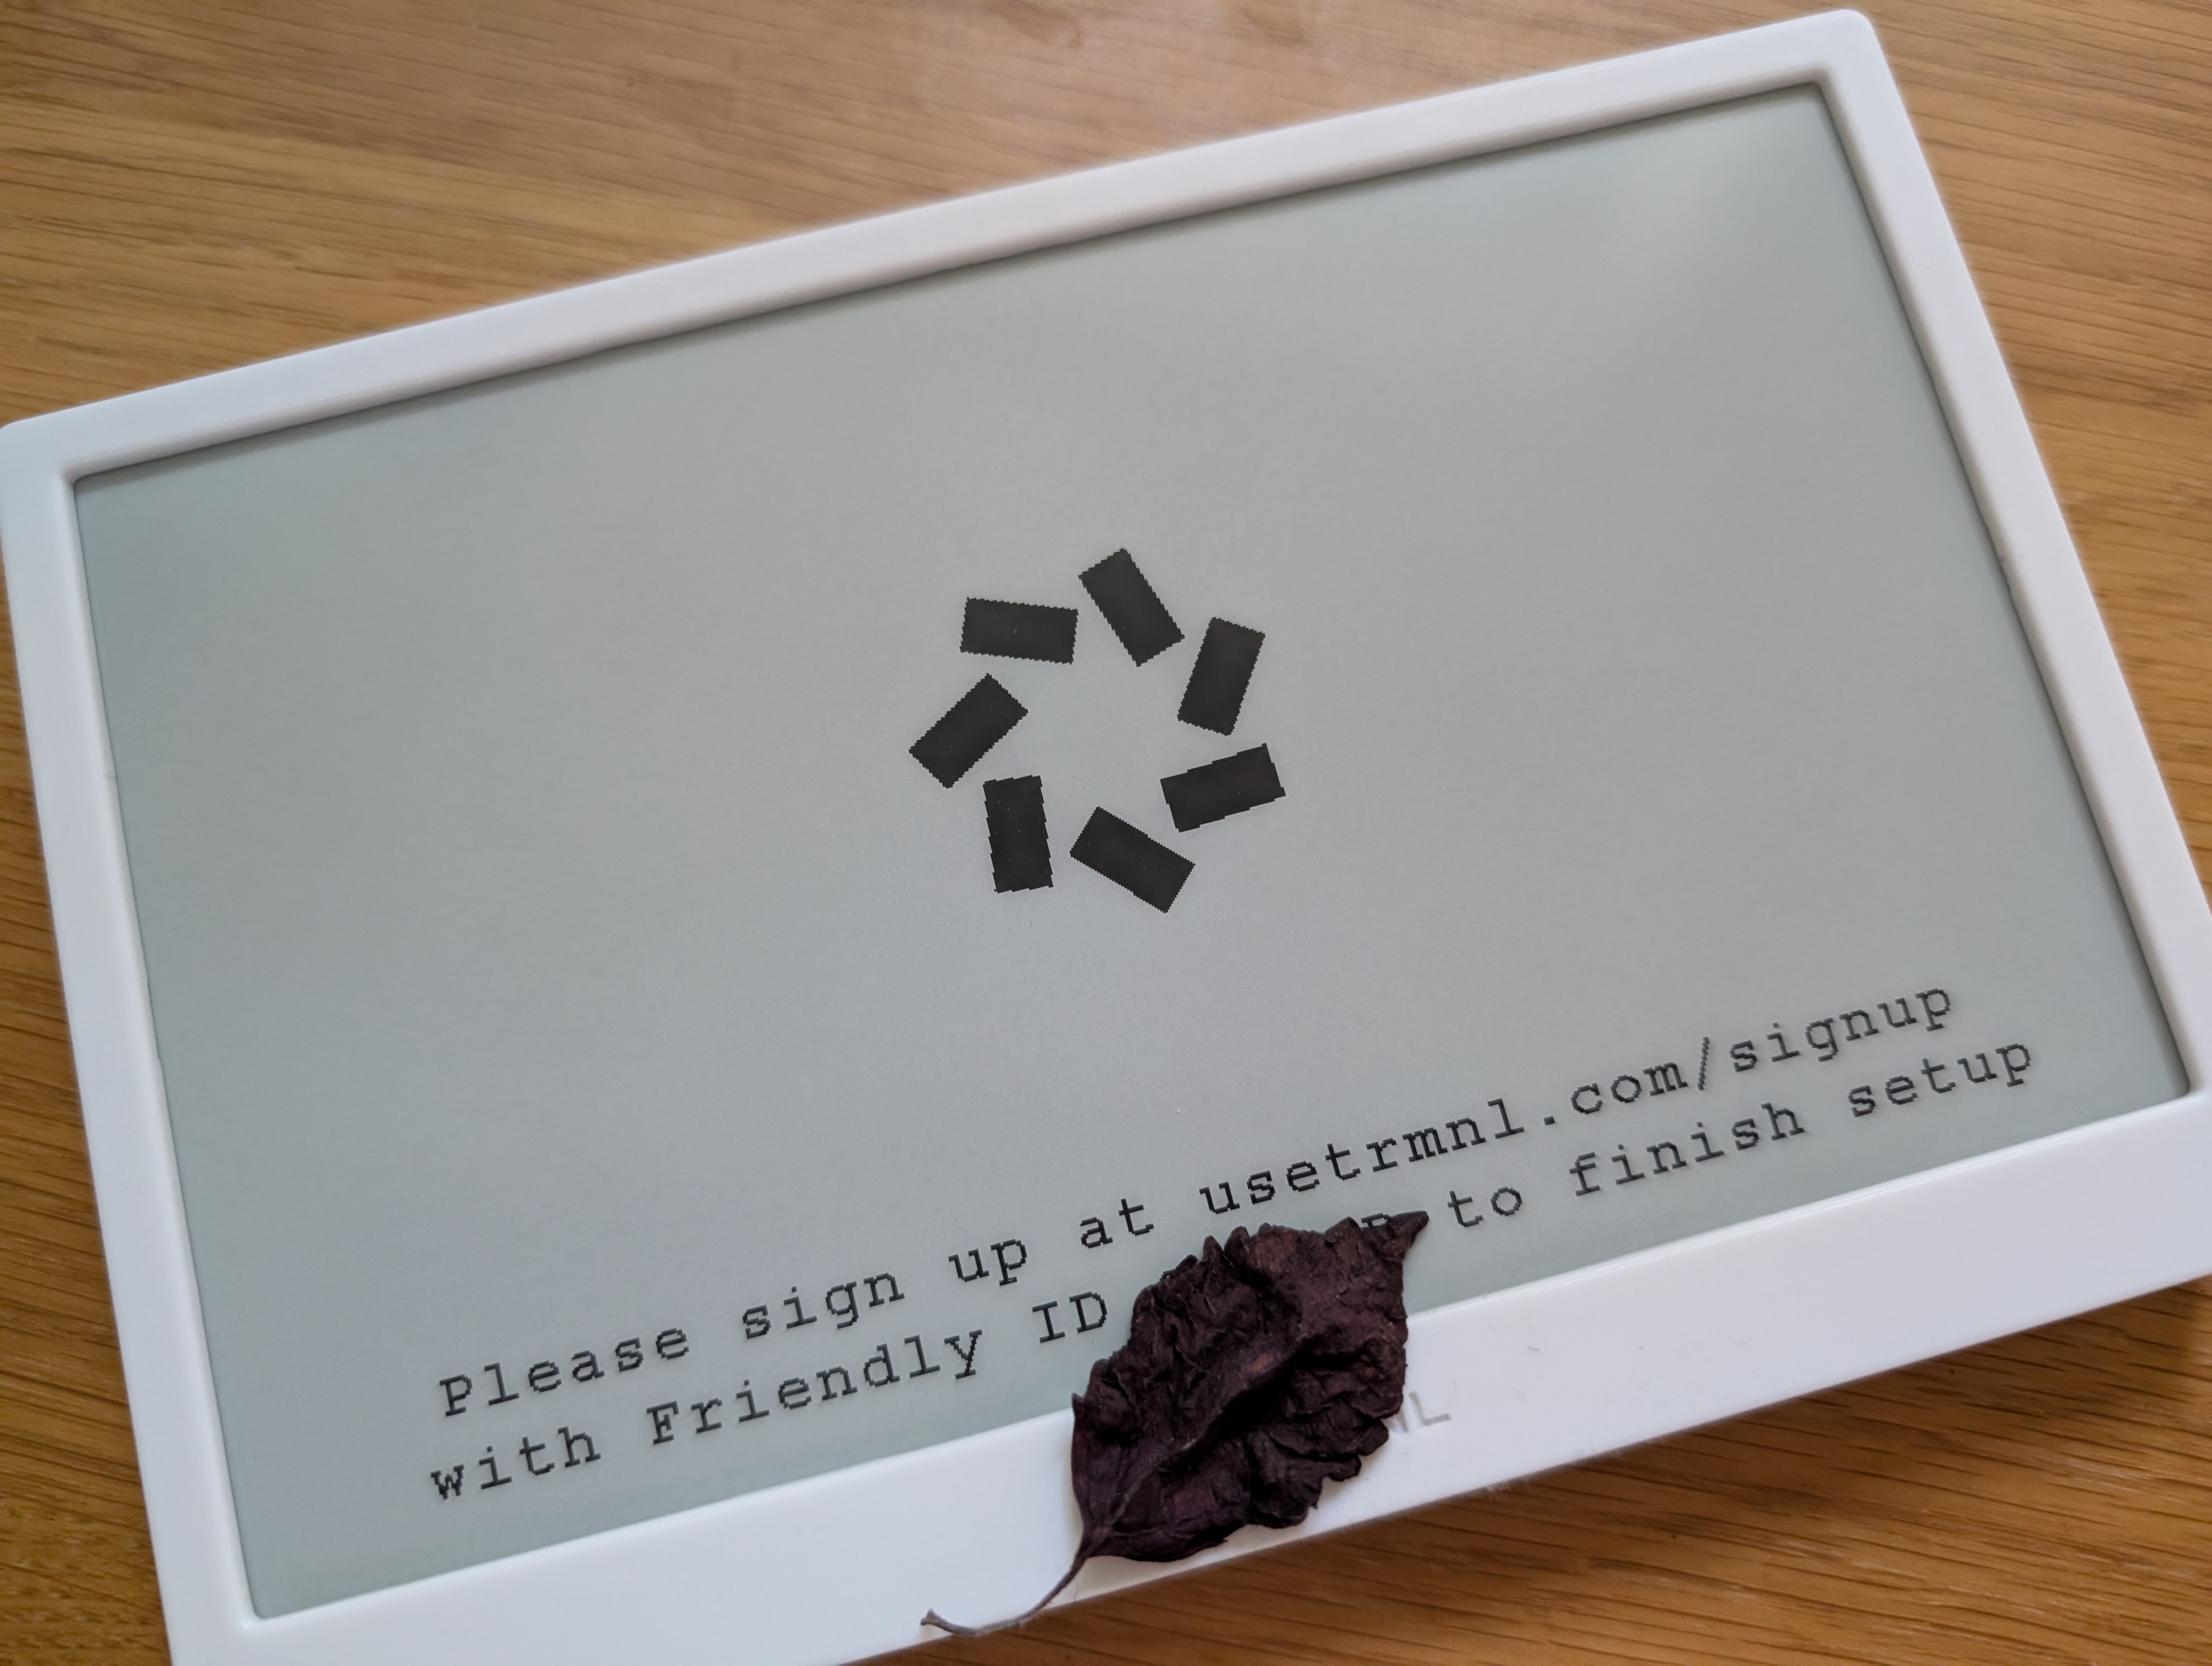
This is probably a super nice and friendly setup, but I bought this to stay off the cloud so let's try again. You can reset the device by pressing the button after power on, be quick! You need to hold it down for a second or two. I have less success holding it down while powering on the device.
Let's try again, pressing the custom server button brings up a third field below the password where you can enter an URL. Not the best user experience, a little confusing but overall I have see much worse. Let's spin up a netcat listener on my laptop to see what arrives. I entered http://192.168.1.100:4711 and pressed connect.
❯ nc -l -p 4711

POST /api/log HTTP/1.1
Host: 192.168.1.100:4711
User-Agent: ESP32HTTPClient
Connection: keep-alive
Accept-Encoding: identity;q=1,chunked;q=0.1,*;q=0
ID: XX:XX:XX:XX:XX:XX
Accept: application/json
Access-Token: 123456abczyj
Content-Type: application/json
Content-Length: 544

{
    "log": {
        "logs_array":[
            {
                "creation_timestamp":1748453737,
                "device_status_stamp":{
                    "wifi_rssi_level":-85,
                    "wifi_status":"connected",
                    "refresh_rate":5,
                    "time_since_last_sleep_start":0,
                    "current_fw_version":"1.5.4",
                    "special_function":"none",
                    "battery_voltage":4.046,
                    "wakeup_reason":"button",
                    "free_heap_size":186776,
                    "max_alloc_size":159732
                },
                "log_id":4,
                "log_message":"Failed to resolve hostname after 5 attempts, continuing...",
                "log_codeline":566,
                "log_sourcefile":"src/bl.cpp",
                "additional_info":{
                    "filename_current":"",
                    "filename_new":"",
                    "retry_attempt":1
                }
            }
        ]
    }
}
Note that this is a log message (sent to /api/log) containing an informative error message. The screen also says, "WIFI connected, but API connection cannot be established. Try to refresh, or scan QR code for help."
From the examples in the README in the firmware repository, I also expect it to call /api/setup to configure itself (I guess this failure is what was logged above), and then regularly call /api/display to fetch information on what to display on the screen.
I guess this concludes the setup phase. Let's start developing a small server implementation. But that's for another day. It's getting late here, and I will be traveling for a few days.
Let's write a simple server
Four days later, I'm back and ready to write some code!
These days I'm most comfortable in Python. I have also been using FastAPI in recent years, so I will pick these. I will use uv (a new-ish tool for me) and, to speed things up, I will generate the boilerplate code with AI (Claude Sonnet 4). So let's start hacking.
Let's start with the log endpoint, and use an SQLite database to store the records. Booting my TRMNL, I received these requests:
INFO:     192.168.1.142:59126 - "POST /api/log HTTP/1.1" 200 OK
INFO:     192.168.1.142:59127 - "GET /api/display HTTP/1.1" 404 Not Found
INFO:     192.168.1.142:59128 - "POST /api/log HTTP/1.1" 200 OK
INFO:     192.168.1.142:59129 - "POST /api/log HTTP/1.1" 200 OK
Interesting, I can't see any requests to the setup endpoint yet. But I did receive a request to /api/display. Is the setup optional? If I look in the SQLite database, the records are saved. However, reading them this way isn't ideal, so let's continue by building something more interesting to look at.
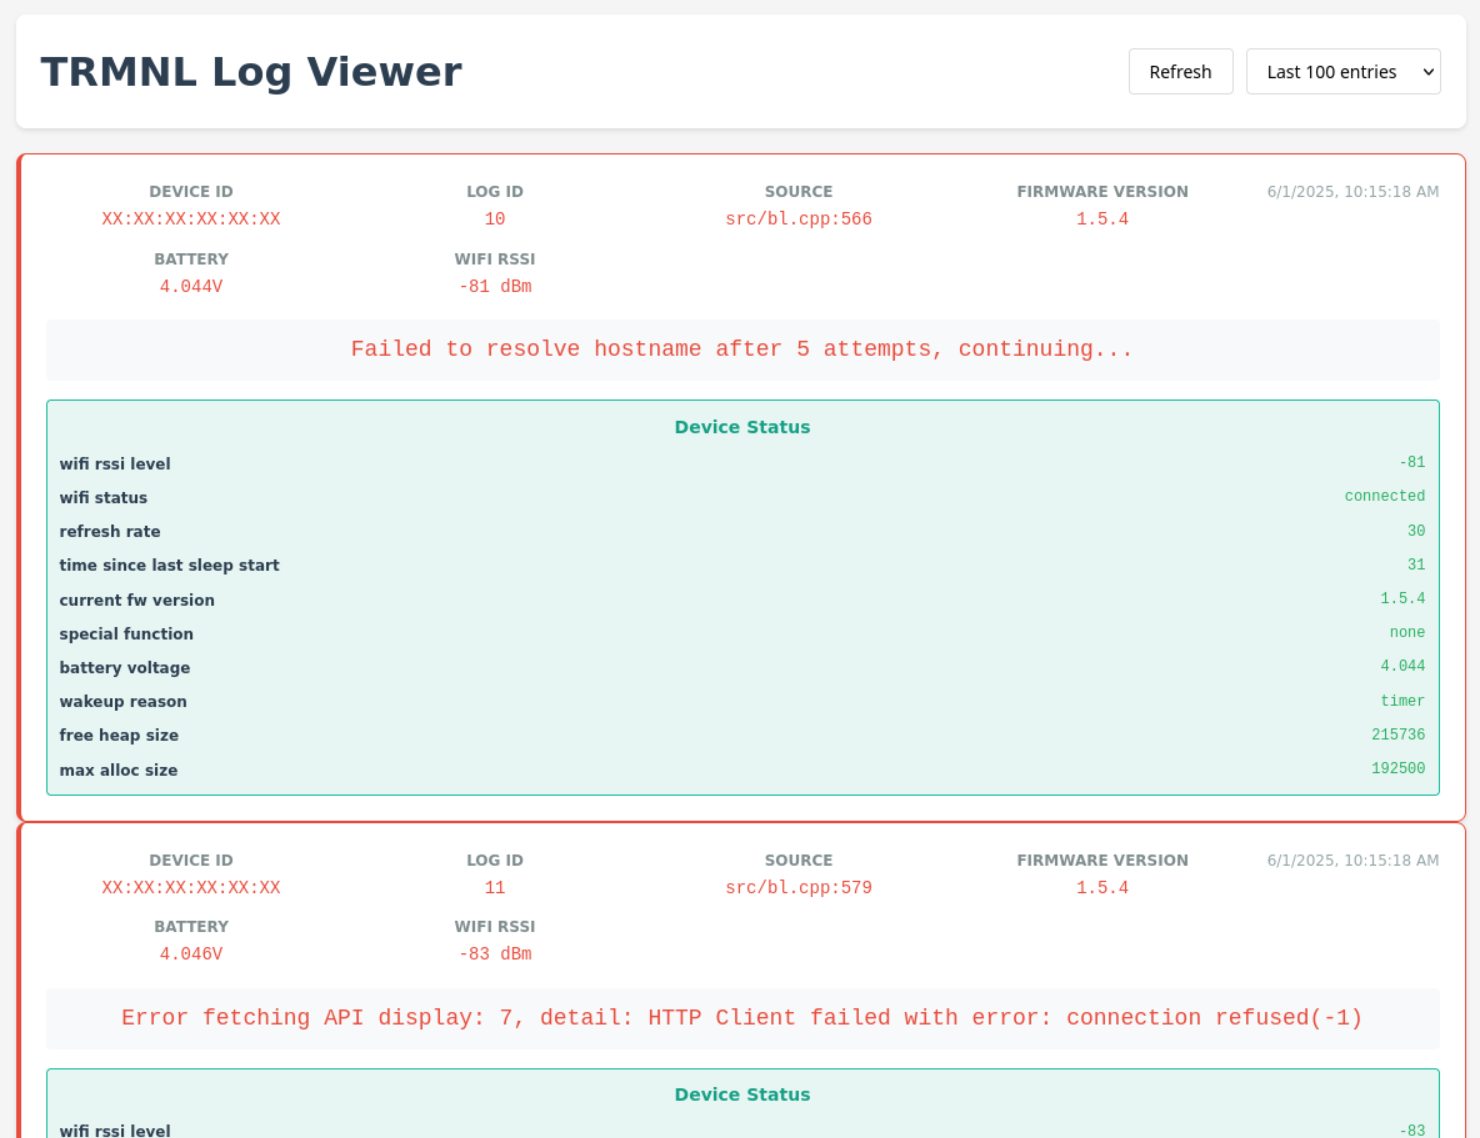
This is one of the wonderful things about AI! Creating this UI took me less than a minute. In the past, I probably wouldn't have bothered and would have just queried the database directly. This is much nicer.
This time, let's actually read these log messages and see what's going on here!
Failed to resolve hostname after 5 attempts, continuing...
In src/bl.cpp:566 (source), on closer inspection, it indeed appears that it tries to resolve the entered value five times, but the code path seems to continue (as the message indicates). So, perhaps I can ignore this. I guess pointing it to a valid DNS server will fix this later.
Error fetching API display: 7, detail: HTTP Client failed with error: (404)
In src/bl.cpp:579 (source), as the line number suggests, this is just a few lines down the code path from the previous message. Let's try to implement the /api/display endpoint, which is documented here.
The above image is served from a bitmap endpoint that I let AI generate, a perfect placeholder. With this, we have the nice picture displayed. I waited for it to refresh, and it rendered nicely!
If you are curious, the JSON I'm sending back on /api/display is as follows:
{
  "status": 0,
  "image_url": "http://www.example.com/bitmap.bmp",
  "filename": "2025-06-01T19:36:10",
  "update_firmware": false,
  "firmware_url": null,
  "refresh_rate": "60",
  "reset_firmware": false
}
My understanding is that filename is used for as a cache key for caching, so you need to update the filename if the image has changed. Please note that 60 is way to low for real use, some thing like 1800 or 3600 is probably more appropriate.
So why was /api/setup never called? I suspect that it was called on my initial attempt when I accidentally connected to the cloud service. It probably configured itself and assigned an api_key that was then stored on the device. Holding the button to return to the captive portal to select a custom server likely only reset some of the settings, not the key. This also explains why both the log and display endpoints receive an Access-Token.
So, it was time to try again. This time, I pressed the button labeled "Soft Reset" on the captive portal, and it did indeed reset the keys. Let's try again. This time, I will use my laptop's local DNS name (it made no difference).
INFO:     192.168.1.142:61286 - "GET /api/setup/ HTTP/1.1" 404 Not Found
Missing Access-Token header
INFO:     192.168.1.142:61287 - "POST /api/log HTTP/1.1" 400 Bad Request
Missing Access-Token header
INFO:     192.168.1.142:61288 - "POST /api/log HTTP/1.1" 400 Bad Request
INFO:     192.168.1.142:61289 - "GET /api/display HTTP/1.1" 200 OK
INFO:     192.168.1.142:61290 - "GET /api/bitmap?width=800&height=480 HTTP/1.1" 200 OK
Interestingly, it tried to call the setup endpoint this time. However, even when the server responded with a 404, the device carried on, calling the log endpoint and then fetching an image. This approach almost works. The main issue is that each failed call to the setup endpoint flashes the configuration screen for a few seconds until the next display call.
Let's implement the setup endpoint. Please note that the device calls /api/setup/ with a trailing slash. It also annoys me a little that this is a GET request, which is, wrong!
INFO:     192.168.1.142:63083 - "GET /api/setup/ HTTP/1.1" 200 OK
INFO:     192.168.1.142:63083 - "GET /api/bitmap?type=setup_cube HTTP/1.1" 200 OK
INFO:     192.168.1.142:63084 - "POST /api/log HTTP/1.1" 200 OK
INFO:     192.168.1.142:63085 - "POST /api/log HTTP/1.1" 200 OK
INFO:     192.168.1.142:63086 - "GET /api/display HTTP/1.1" 200 OK
INFO:     192.168.1.142:63087 - "GET /api/bitmap?width=800&height=480 HTTP/1.1" 200 OK
INFO:     192.168.1.142:63088 - "POST /api/log HTTP/1.1" 200 OK
Success! I recorded the ID header (my MAC address), generated an api_key and a friendly_name, and stored these details in the database. The response looked something like this:
{
  "status": 200,
  "api_key": "my-api-key",
  "friendly_id": "abc",
  "image_url": "http://www.example.com/setup_bitmap.bmp",
  "filename": "setup_cube"
}
I am not sure if I really need any of these things, as the device does not validate the key. Validating the key is the server's job. This validation only makes sense for a server that manages multiple devices or for implementing security more robustly. This level of security is probably more important for the official cloud service than for my local installation. I will store them anyway in case I need them in the future.
Next step
My next steps are to clean up the code and implement a few missing bits, such as adding support for multiple devices. Then, I need to find a good way to convert a dashboard into a bitmap image using Python. But that's a task for another day.